Using the Local Information System for enquiries

Overview
The local information page is split into two panes:
- The search pane appears on the left hand side. It allows you to describe what you are looking for. You can:
- search for index entries containing words or characters you specify;
- lookup index entries alphabetically;
- use any soft buttons set up in your system; and
- display the help pages.
- The results pane appears on the right hand side. This pane shows you any matches in the database for your search and lookup requests. To start with the results are shown as a list of titles. Clicking the title shows all the information available from that item. If, however, there is just one match, the system expands it for you automatically.
This section describes how to use the system to make enquiries. Features that allow you to update the database are described here.
Search the database
You can see the following at the top of the search pane:
Enter the words or characters you are looking for in the text box and click the Search button (or use your browser's 'S' access key) to find matching entries in the database. The results are shown in the results pane.
The database looks for index entries that contain the words or characters you are looking for. So entering "council" would match with "Epsom and Ewell Borough Council". Note that the search is not case-sensitive so "Council" matches with "council", "Council", "COUNCIL", and any other combination of upper and lower case characters. Matches can be anywhere in words - not just the beginning so "psom" would also match "Epsom and Ewell Borough Council".
If you enter two or more search items separated by a space, the database will search for any index entries containing all the search items in any order so any of the following will all find "Epsom and Ewell Borough Council":
- "epsom council"
- "ewell council"
- "bor eps"
- "som ell"
You can also specify the special search term "*all" on its own to show all the entries in the database.
You can also exclude entries by entering a negative search term. Negative search terms start with "-" so searching for "epsom council -housing" will find all "Epsom and Ewell council" entries but exclude those relating to housing.
NB. The system automatically excludes small words like "in" and "of" when indexing entries. It therefore removes them from any searches you make because, otherwise, you are unlikely to find a match. So, if you search for "member of parliament", the system changes your search to "member parliament".
Alphabetic lookup
You can see the following at the top of the search pane:
Enter the characters you are looking for in the text box and click the A-Z button (or use your browser's 'A' access key) to find index entries that start with the text you enter. The results are shown in the results pane.
Entering "eps" would match with "Epsom and Ewell Borough Council". But entering "ewe" would not match because the index entry does not start with "ewe". Note that the search is not case-sensitive so "Epsom" matches with "eps", "Eps", "EPS", and any other combination of upper and lower case characters. You can match using any number of characters - however, the more you specify the more likely you will eliminate spurious entries.
Advanced searches
In addition to the 'Search' and 'A-Z' buttons we describe in the previous section, you might see the 'More..' and 'Full Text' buttons at the top of the search pane. Either or both buttons might be suppressed in your version of the system for accessibility or performance reasons.
Enter one or more search terms and click Full text to find all entries containing those terms in the item text. You can enter parts of words and - like the main searches - you can use '-' to exclude entries containing given search terms. The difference between the 'Full Text' and Search buttons is that the full text search scans the text of each item. The Search button searches index entries created by the database administrators so, for example, an entry about doctors might be found by using the Search button and search term 'GP' even if 'GP' does not exist in the item's text.
If you click the 'More...' button, you see the full range of searches available:
To execute a search, enter details in the search box and either:
- Click the relevant button; or
- Use your browser's access key indicated by the bold letter in the button text
The individual buttons work like this:
- Change - enter a date to see all entries that have not changed since a given date. This helps you find entries that might be due for an update.
- Review - the database allows people maintaining entries to specify a date in the future when the entry should be reviewed. This search allows you to find all entries due for review on or before the date you enter.
- Recent - enter a date to see all entries that have changed since a given date. This helps you review entries that have changed recently.
- DB id - the system automatically allocates a numeric id to all entries in the database. This database id uniquely identifies each entry. Enter an id to retrieve the entry with that id from the database.
- LI ref - optionally, each entry can have a local information reference allocated by the database coordinator(s). You can find all entries with a local information reference starting with the characters you enter (as with other searches, case is ignored).
- Less... - hides the advanced search buttons and replaces them with the 'More' button.
Your browser will remember whether you choose to see the additional search buttons, or not, provided you have not disabled cookies.
Working with results
You use the left hand search pane to search for entries in the database, perform alphabetic lookups or action soft buttons.
Results are presented in the results pane on the right hand side.
Most results are shown as a list of matching entries from the database. Items marked by administrators as 'popular' are shown first. Remaining matches appear either:
- Most recently changed first - these are most likely to be up-to-date; or
- Alphabetically by item title.
You determine the sequence by your selection in the search pane:
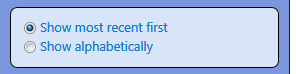
Your browser will automatically remember your selection for the next session
Each item is listed like this...

The main text is the title of the matching entry. You can see the date the entry was last changed or reviewed as a sub-heading. In this case...

An alphabetic search matched an alternate index entry "Disabled". That's shown in the sub-heading in case you are unsure why this entry matches what you are looking for.
If you place your mouse over the title, it becomes bold indicating it is a clickable link. Clicking the title or the blue triangle (known as a twistie) shows all the detail we hold for the entry like this...

Note that the twistie is pointing down to indicate the entry has been expanded. Now the item is expanded you can see:
- The two file references. The local information reference (if present) means there is more information available from the paper file under the reference shown. The database reference is a serial number allocated by the database software to each entry. It never changes so it is a useful way to provide a unique reference to a given entry. If you want to report a problem with an entry, make a note of the database reference; it will help the database administrator.
- The main text of the entry. The database has the ability to hold a virtually unlimited amount of text for each entry.
- Links to additional sources of information. In the above example there are two links to the Surrey libraries web site. The database system can carry links to both the web and to documents in the CAB local network. Again, if you put your mouse over a link it becomes bold indicating it is an active link. Clicking it will take you to the relevant web page or will show you the linked document.
Clicking the database reference number shows the clicked item in a page on its own, allowing you to print just that item or take a screen shot of it.
Clicking the title again collapses the item back to...
You can expand and collapse results until you find what you are looking for.
Some items might be marked as 'popular'. That's because they provide answers to many questions on a given subject. For example, a reference to a list of local doctors might be a popular match for "doctor". Popular items are shown before other items from the database and are marked with an icon like this:

Some items might be marked as 'Obscure'. Obscure items are not displayed in search results initially. If a search includes obscure items, you see an item at the end of the list telling you that one or more obscure items are available. Clicking this entry causes the obscure items to appear at the end of the list showing the following icon:

Soft buttons
Administrators can add up to 2 soft buttons to the adviser screen and define what they do. They can also specify the text on the button and the tooltip that appears when you hover your mouse over the button. There are three kinds of soft button:
- Index search runs a specified search. In Epsom & Ewell we use this to show local news and internal bureau documents by searching for the special key word "adviser". The button can also show a red border to a button if there are matching items that changed within a specified number of days.
- Web address displays a specified web page. This could be a the Government portal page, for example.
- Document reference displays a specified document from your network. This could be an internal web page containing a list of relevant links, for example.
Resizing the panes
If you place your cursor at the right hand edge of the search pane, it will change to a double-headed arrow. You can drag the cursor to the right to make the search pane wider, or to the left to make it narrower.
As you resize the search pane you might see odd results such as the text no longer fitting inside the search pane, or the results pane dropping below the search pane. That's because the system does not resize all the panes dynamically. Instead it will rearrange the page to work with the new size of the search pane the next time you click a search button or refresh the page.
The browser will remember the new size of the search pane and will continue to use it for subsequent sessions provided you have not disabled cookies.
You can also resize the search pane using the '<' and '>' buttons at the foot of the pane. They are particularly useful for tablet PCs that do not have a mouse.
Access control
This system might have been set up to require you to enter a user id and password before you can use it. If so, you will see a page like this when you try to access a page in the system (except these help pages):
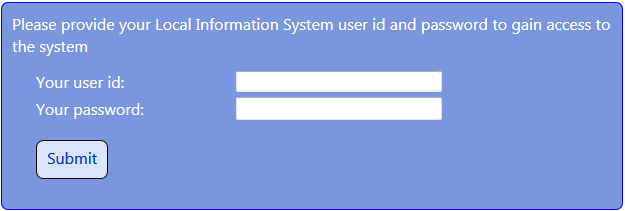
Enter the id and password provided to you. You can press Enter on the keyboard to submit your credentials. You don't have to click the Submit button with your mouse.
The log in page remembers the page you are going to and will load it for you when you enter a valid id and password.
Once you have gained access to the system, you can keep using it until:
- You close your browser
- You click the 'Log out' button at the foot of the search page
- You try to navigate to a new page (including clicking a link to reload the search page) after a period of 20 minutes inactivity...
... at which point you will see the logon page again.
If your system allows access without a user id and password the log in page shows a 'Continue anonymously' button. This takes you to the main search page in a logged-out state.
Depending on how your system has been set up, you might see a 'Log out' button towards the bottom of the search pane and a 'Change password' button when you are logged in:
Click the Log out button to prevent subsequent users of your PC from using your id and password to access the system. When you click the button, you see the log on page.
Click the Change password button - if it appears - to change your password in the system. You will see the following page:
The page tells you the criteria new passwords must meet. The criteria might be different in your system. To update your password, enter it twice and click 'Update'.